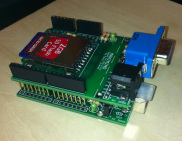
The Original Maximite is a small and versatile single chip computer, created by Geoff Graham. He followed that with the Colour Maximite that runs a full featured BASIC interpreter with 128K of working memory and eight colours on a VGA monitor. This is like the modern version of the Commodore 64, Apple II or TRS-80 computer that I learned to program on.
It will work with a standard PC PS2 keyboard and because the Maximite has its own built in SD memory card and BASIC language, you can start writing and running BASIC programs right out of the box.
It will work with a standard PC PS2 keyboard and because the Maximite has its own built in SD memory card and BASIC language, you can start writing and running BASIC programs right out of the box.
The Colour Maximite also has 40 input/output lines including an Arduino compatible connector. These I/Os can be independently configured as analog inputs, digital inputs or digital outputs. You can measure voltage, frequencies, detect switch closure, etc and respond by turning on lights, closing relays, etc - all under control of your BASIC program.
The design and the firmware including the BASIC interpreter is free to download and use. And all this is powered by a single PIC32 chip which costs just $9.58.
I have bought and built several variations of Maximite but I've finally settled on the the Colormax2. There are other boards out there that come as kits but the Colormax2 comes completely assembled as a circuit board computer. There are a few features you can solder on such as a power connector and Arduino headers. You can also add a stereo sound output. My Battery-Shield plugs in and makes the board portable since the shield can power the computer.
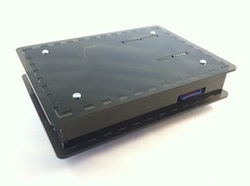
But I decided I wanted to make this more useful and I also wanted to use Makercase.com software again to get better at creating laser cut boxes. So I created the box below to house my Maximite based board.
 My Maximite Box Design
The box is made of smoked acrylic and has slot in the front for the SD card. It also has slots on top for the Arduino connectors to poke through. The back has the Keyboard, VGA, Power, USB and Expansion connector slots. I plan to add a hole for the audio connector in the next version.
I added rubber feet to the bottom and the whole box is held together with standoffs and screws. I like it so much I may use the BasicBoard name and release this as a product. I can then add expansion boards to the back and CHIPINO shields to the top. The best part is you don't need a computer to use it; it is the computer.
This is a great way for a kid to learn programming the same way us old timers did. In fact I bet there are a lot of old times who might want one of these to play with instead of learning C code for Arduino or having to learn a C or BASIC compiler. Stay tuned for more on this great single board computer.
Maximino

Maximino (shown to the left) was another one of my Maximite creations. It was based on the original B/W Maximite before the Color Maximite design added Arduino connections. I may update this to the Maximite Color design but first I'm going to focus on the BasicBoard above.
For more info visit my Maximino page.
For more info visit my Maximino page.

