Electronic Products
Find us here:
  • Books
    • Embedded C Books >
      • cbookfiles
      • cbook2files
      • cbook3files
    • BASIC Books >
      • Programming PICs in BASIC_vol1
      • PICBasic Book Support
      • Basic Atom Book Support
    • Other Books >
      • Arduino Book
      • chipkitbookfiles
  • Chuck's Blog
    • Blog Posts Archive
    • Disclaimer
  • YouTube Channel
  • About Chuck
    • About Chuck
    • Stock Car Racing
  • 3D Printing
    • Fabrikator Mini
  • Getting Started with PICs
    • BASIC Programming
    • C Programming >
      • C Compilers
  • Build Your Own PICKit 2
    • PICkit 2 Starter Kit
  • CHIPINO
    • Shields
  • CHIPAXE Breadboard Modules
  • Understanding Hex Files
  • chipKIT
  • Newsletter Archive
  • Contact
  • Retired Designs
    • BasicBoard
    • Ultimate OEM
    • Maximite BasicBox
    • Maximino
  • Downloads
  • Kickstarter Projects
    • Demo-Shield
  • Great Cow Basic Site
  • Buy Hardware
  • Links I Recommend

3D Printed Traffic Light with Electronics

11/20/2015

 
Many times I’m using my 3D printer to make some bracket or box for my lab or one of my projects. But once in a while, it goes the other way and a 3D print inspires a project. That was the case with the 3D print of a traffic light I saw on Thingiverse. It was a design by a Thingiverse user name holgero. I thought the design was interesting and I wondered how well it would print on my Davinci 1.0 3D printer. I also liked the base, which had room for electronics and posts for screwing in the top post that held the traffic light. He designed it to be powered by a USB port but I had other thoughts.
 
Picture
Figure 1
​The traffic light portion was hollow so my plan was to insert an X section inside the design so each traffic light direction had its own compartment for LEDs. This was easy enough with Tinkercad. I imported the .STL file and went to work. I inserted two flat blocks so they formed the X insert.
 
I used the Tinkercad hole feature to make the Traffic Light shell look like an x-ray in Figure 2. This allows you to see the red X piece I inserted into the original design. I’ll change the shell back into a solid object before I produce the .STL file and combine it with the X so it all prints as one solid piece.
Picture
Figure 2
​Tinkercad makes it easy to modify any .STL design but you can’t just edit the original. You have to add plastic or use hole elements to take away plastic. Once everything is brought together as one .STL file then I can send it to the XYZware software that converts it to the G-Code file the 3D Printer needs. This design can be used with any 3D printer.
 
 
Electronics
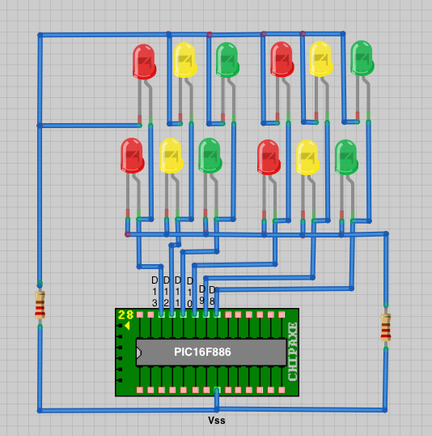
Once I had the 3D printed parts the way I wanted them, I decided to use Great Cow Basic and a CHIPINO mini module to run twelve LEDs to form a full working traffic light. This could be used as a desk decoration or a functional toy for kids. The CHIPINO mini fit in the base and I thought I could fit some batteries but I later found out I was wrong. It was just too tight.
 
I already had some sample code for a three LED Traffic Light in my book Programming PICs in BASIC so I just modified it for Great Cow Basic and 12 LEDs.
 
The program is simple as it just rotates through three I/O for Red, Yellow and Green on one direction and a second set of three I/O for the other direction Red, Yellow and Green. The LEDs on opposite sides are connected together, Green-to-Green, Red-to-Red and Yellow-to-Yellow.
 
​Inserting the wire into the channel created by the X insert required 28-gauge wire and a lot of it. The cathodes (ground) for the LEDs on one lane of lights were connected together and through a single resistor because only two LEDs would be on at one time per lane.
 
I printed the traffic light out in white plastic first and wired up a single set of three LEDs just to make sure everything fit. I used hot glue to hold the LEDs in place. Everything worked great so I printed the final version in black plastic but yellow would probably have made more sense. I didn’t have any yellow so black it was.
 

Picture
Figure 3
The base and the shaft printed out and fit perfectly together so then I was ready to run a bunch of wires through the long tube of the post and then into the traffic light head. The result was a lot of wires. You can see them all connected to the CHIPINO mini module in Figure 4.
Picture
Figure 4
​The final design fit together nicely except I didn’t have enough room for batteries so I powered it up through the programming header on the CHIPINO Mini module. Using a 28 pin PIC16F886 was probably overkill but it worked great. As a future improvement, I hope to print a new bottom that is taller and has grooves to hold a couple AA batteries.
 
The final design is shown in Figure 5. It has independently controlled LEDs and is easy to see with the black background. A could of small screws held the shaft unit to the base. I was able to position the programming header into the slot originally designed for the USB connector.
Picture
Figure 5
Picture
Code sample using Great Cow Basic Compiler. (www.greatcowbasic.com).
'traffic.gcb
'A program to create a traffic light
'on Digital pins 8 thru 13 on CHIPINO
 
'Chip model
#chip 16F886, 4
#include <chipino.h> 'Defines CHIPINO setup
 
#define Red D13              ‘RB5
#define Yellow D12        ‘RB4
#define Green D11          ‘RB3
#define Red2 D10           ‘RB2
#define Yellow2 D9        ‘RB1
#define Green2 D8          ‘RB0
 
'Main routine
Start:
 'Red Light
 set Red on             
 set Red2 off          
 set Yellow off       
 set Yellow2 off
 set Green off         
set Green2 on
 
 wait 4 s
 
'Yellow2 Light
 set Red on             
 set Red2 off          
 set Yellow off       
 set Yellow2 on
 set Green off         
 set Green2 off
 
 wait 1 s
 
 'Green Light
 set Red Off
 set Red2 on          
 set Yellow off       
 set Yellow2 off
 set Green on     
 set Green2 off
 
 wait 4 s
 
'Yellow2 Light
 set Red off 
 set Red2 On          
 set Yellow On       
 set Yellow2 off
 set Green off     
 set Green2 off
 
 wait 1 s
 
 'Jump back to the start of the program
 
goto Start
See this project on YouTube.

    Categories

    All
    3D Printer
    Chipaxe
    Chipino
    Chipkit
    CNC
    Copper Connection
    Dot Matrix
    Elproductsnews
    Expresspcb
    Graphic Lcd
    Great Cow Basic
    Kickstarter
    Lcd Shield
    Makefaire
    Makercase
    Maximite
    Microchip Pic
    Pickit 2
    Pickit 3
    Videos

    Visit previous blog posts in the archives below.

    Archives

    February 2018
    October 2017
    September 2017
    July 2017
    November 2016
    August 2016
    July 2016
    May 2016
    March 2016
    January 2016
    November 2015
    September 2015
    August 2015
    July 2015
    June 2015
    April 2015
    March 2015
    February 2015
    January 2015
    December 2014
    November 2014
    October 2014
    September 2014
    August 2014
    July 2014
    June 2014
    May 2014
    April 2014
    March 2014
    February 2014
    January 2014
    December 2013
    November 2013
    October 2013
    September 2013
    August 2013
    July 2013
    June 2013
    May 2013
    April 2013
    March 2013
    October 2012
    October 2011

    RSS Feed


    About Chuck

    Chuck has been programming with PIC Microcontrollers since there were only five devices. Now there are over 700 and growing. He also has a lot of fun 3D printing designs using his Davinci 3D printer and TinkerCad software. In this series of blog posts and occasional videos on his YouTube Channel he tries to help you get started with electronics and 3D printing.

    Disclaimer

Powered by Create your own unique website with customizable templates.