Electronic Products
Find us here:
  • Chuck's Blog
    • Blog Posts Archive
    • Disclaimer
  • YouTube Channel
  • About Chuck
    • About Chuck
    • Stock Car Racing
  • Books
    • Embedded C Books >
      • cbookfiles
      • cbook2files
      • cbook3files
    • BASIC Books >
      • Programming PICs in BASIC_vol1
      • PICBasic Book Support
      • Basic Atom Book Support
    • Other Books >
      • Arduino Book
      • chipkitbookfiles
  • 3D Printing
    • Fabrikator Mini
  • Getting Started with PICs
    • BASIC Programming
    • C Programming >
      • C Compilers
  • Build Your Own PICKit 2
    • PICkit 2 Starter Kit
  • CHIPINO
    • Shields
  • CHIPAXE Breadboard Modules
  • Understanding Hex Files
  • chipKIT
  • Newsletter Archive
  • Contact
  • Retired Designs
    • BasicBoard
    • Ultimate OEM
    • Maximite BasicBox
    • Maximino
  • Downloads
  • Kickstarter Projects
    • Demo-Shield
  • Great Cow Basic Site
  • Buy Hardware
  • Links I Recommend

8-Pin Microcontroller 3D Printed Box

8/28/2014

1 Comment

 
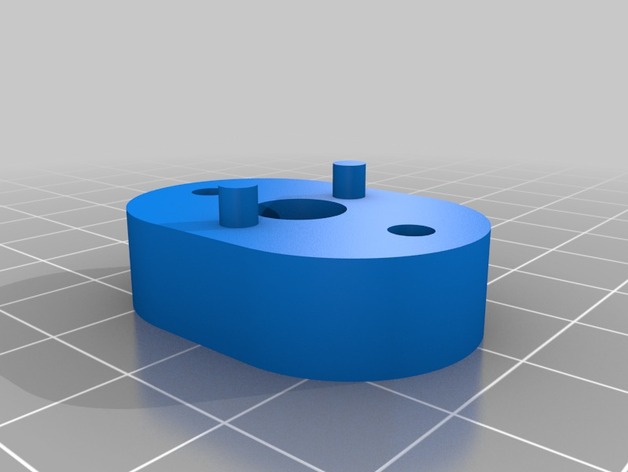
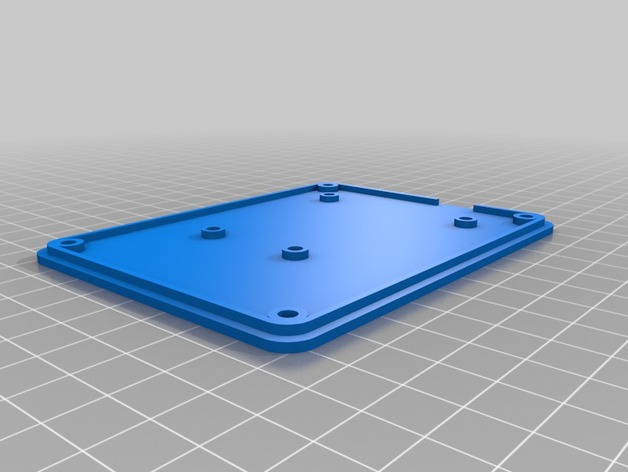
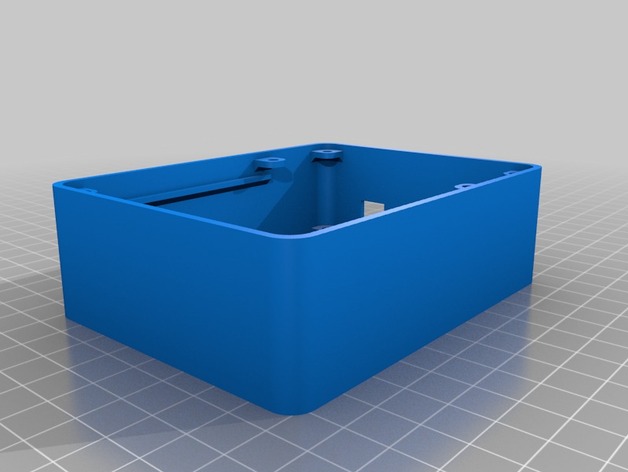
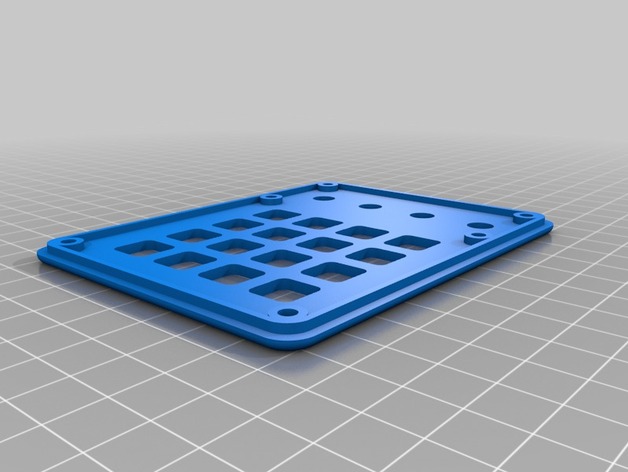
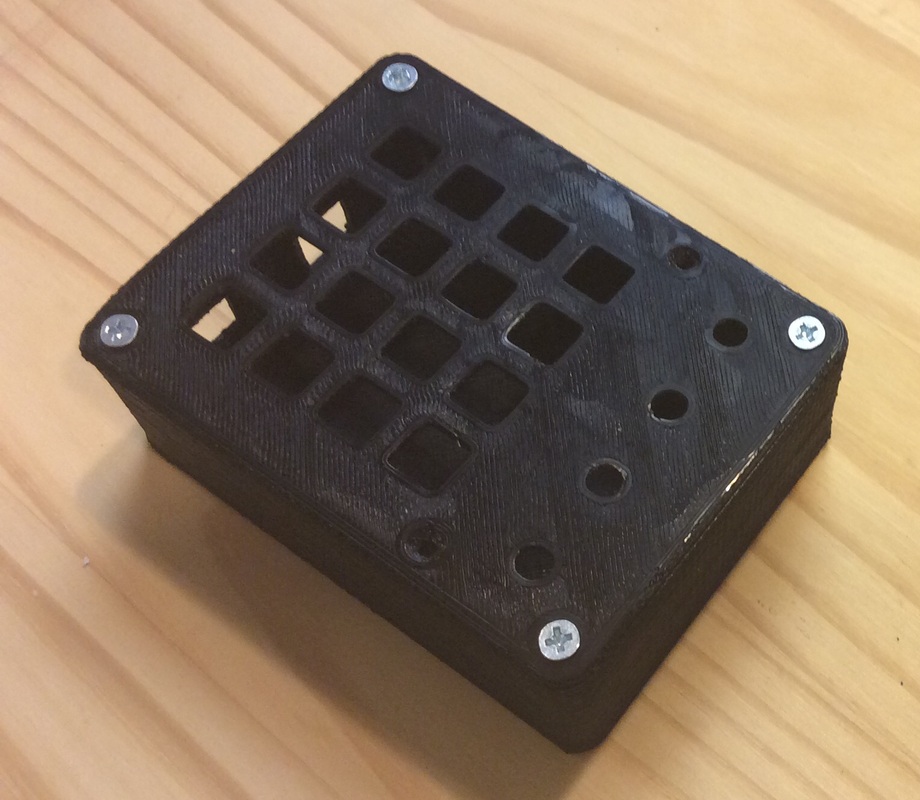
I just posted another 3D Printer Project on my YouTube Channel. This time I created a box that holds a breadboard with space underneath for storing components. The box is shaped like an 8-pin Microcontroller. I used a thingiverse design from user tetralite who created an actual size 8-pin microcontroller 3D print design. So I took the design and made it much larger to fit a breadboard on top.
Picture
Picture
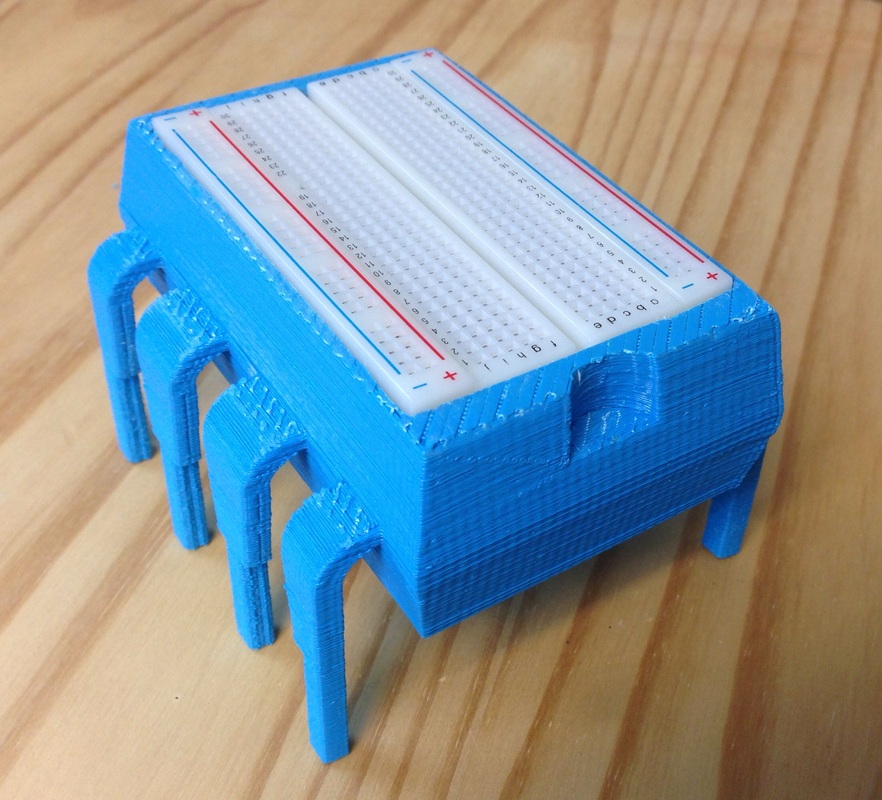
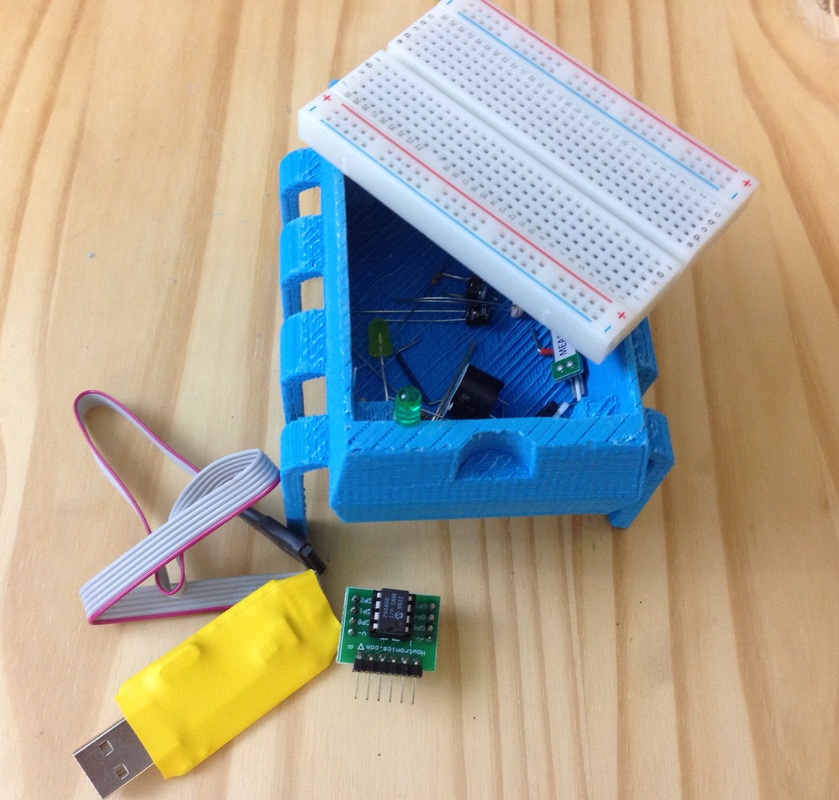
The breadboard is held up by four posts underneath but also has lots of empty space inside the microchip body. This allows you to store components inside. In fact it fits all the components I used in my book "Programming PICs in BASIC" which uses an 8-pin Microcontroller.

I used TinkerCad for the modifications and then printed the design on my Davinci 1.0 printer. The design had a lot of support material to be removed but it came out very solid and smooth with a little clean-up. I also used a raft as the base to try and prevent any warpage which seemed to work well. You can see the full project description in the video below.
This started out as just a fun project that grew bigger as I thought about it. At first I only recessed the breadboard into the top of the chip but then realized all that plastic under it could be hollowed out for storage. I released the .stl file on Thingiverse for anybody to build. Check it out and let me know if you build one too.
1 Comment

Replacement Bearing Holder Arrived

8/25/2014

1 Comment

 
The replacement bearing holder for my Davinci 3D printer arrived today. THE replacement, not set of replacements, THE replacement. I received ONE plastic replacement because I showed them a picture of ONE broken bracket. The cost of sending the bracket under warranty through Fedex Ground would not have cost much more to send me a pair or a full set of four. I guess I made the mistake of assuming they would send me a set not just one. 

I hope I don't find another broken one or even break one when I take it apart. The problem here was I can't easily get to the left side bracket to see if it was cracked. I tried to get my camera in there to take a picture but even that was tough. So I won't know until I take it apart. And if its broke, I'll be waiting another week for a replacement. There are numerous posts about these breaking on various forums so I know this isn't a rare issue. And many people reported getting full sets of brackets.
Picture
Honestly, to go through all the work of packing and shipping a replacement sub $0.50 piece of plastic, would it have hurt to send at least two?

I do appreciate the follow-up support for the Davinci warranty. They have replaced everything I showed as failed so far including my extruder which I posted about prior. From now on though, I suggest you make sure you spell out everything that is wrong before making a request for replacement. I know I will.
There are 3D print files of an improved bracket on Thingiverse so I may print a few of those out before I tear it apart so I have enough parts to put it back together.

XYZprinting, if you are listening, thanks for the replacement but in the future at least send a pair or a full set of four.
1 Comment

Davinci 3D Printer Bearing Case Cracked

8/15/2014

0 Comments

 
There is an independent forum for Davinci 3D printer users to share ideas. While on the forum I saw they were discussing broken bearing mounts for the Y-axis shaft. So I looked at mine and discovered I had the same issue. The back right bearing mount was cracked at the bottom as seen in the picture below.
Picture
I haven't seen any issues from it but I do note that small holes don't seem to print well. I'm not sure if this broken mount has anything to do with it but I want fix it so I can find out. I sent an email request to the support team at XYZprinting and since they were very responsive with the broken extruder, I'm hoping this can be fixed as well. One forum member said they sent him 4 new brackets. I just sent the email request today so we'll see how fast they respond.
Picture
One of the forum members (bret4) created a replacement and posted it on Thingiverse. Now this makes the most sense because I can 3D print a replacement before the bearing mount completely comes apart. Why XYZprinting doesn't have the plastic parts as 3D print files for customers to download is beyond me. I hope they eventually do so because then, when this thing is out of warranty, I'll be able to print replacement parts easily.
Some people prefer the Thingiverse mount because its stronger but I'd still like to have a good set of originals to work with. If you have a Davinci 3D printer and have already replaced the bearing mount, comment below how the replacement process went. It looks like it's going to be a pain to replace and some have mentioned on the forum that you have to get the Y axis perfectly square to the X axis or your prints will be off. That makes a lot of sense but also sounds like a very sensitive procedure. I'd prefer to have picture supported directions or YouTube video on how to replace them. If not I may end up creating that.
 
0 Comments

Merredith Perry Bashes Engineering

8/13/2014

0 Comments

 
This has got to be one of the most insulting presentations towards Engineering I have ever seen. And directly from someone (Meredith Perry CEO of UBEAM) who depends on engineers to get her product to market. I understand the point that great ideas can come from anybody and with the proper support those ideas can become reality. But to go on stage and claim that engineers are two dimensional (will it work or won't it work) just shows the lack of understanding this person has for engineering. Engineers figure out why something won't work and then figure out how to redesign it to make it work. Sometimes we fail and many times we succeed. With hard work and perseverence. 
Yes, I am an engineer and proud to say I have designed some of the products that are in many of the cars on the road today. I've helped others get their ideas to market, many times for free just to help out a friend or someone I thought just needed that extra experience my engineering background could offer.

You don't have to blame the engineers for your failure to innovate. I've told many people I didn't think their idea was a good one or practical, mainly because I knew how much money or time or effort it would take just to get a prototype to work. I was trying to save them the pain and expense that can come from the long hours of trying to get something to work. Some people pushed on and found I was right, some proved me wrong with clever work-arounds. But none of them blamed me. In fact they thanked me for offering them helpful advice. If my advice as an engineer stopped them from pursuing it then they didn't believe in it themselves or didn't really have the desire to do it. But don't blame the engineer for that.

The presenter mentions that she discovered all the initial information for her idea in two days on Google. Where does she think all that Google info came from? My guess is that much of it came from engineers who were willing to share their knowledge online for free.

And despite her apparent hatred for how engineers can be so unhelpful, just look at what her website is looking for:
Picture
I wonder if they show this video during the interview process?

So if you ever get a boat load of venture funding for your idea, don't go on TED and bash some of the key people you need to make that idea a reality. It's not what I would call great PR.
0 Comments

Davinci 3D Printer iPhone Tripod Mount

8/8/2014

0 Comments

 
I just launched another YouTube video. This time I show you how I 3D printed a tripod holder for my iPhone 5. I found the design on Thingiverse and then modified it in TinkerCad.
Picture
Picture
The original design had equal height sides that the iPhone sat between. But that resulted in one side blocking my view when filming. So I loaded the .stl file from user SamCass into TinkerCad and modified it to hold my phone with case and lowered one wall.
I printed it at 0.4mm height and 10% fill. It printed in about 30 minutes. The design is simple but effective. I can easily remove the phone and review the video clip.
If you like this project then please subscribe to my YouTube Channel. I hope to have more coming very soon.
0 Comments

YouTube Video on Solder Tip Cleaner

8/6/2014

0 Comments

 
I've had a YouTube Channel for a while but never did much with it. Then recently settled on the theme I'd like to have and that's "How-To" for the beginner. "How-To" get started with electronics, "How-To" get started with 3D printing, and more. So I've started posting more videos.
I decided to make the videos shorter and to the point to start. I've found many YouTube channels have videos that run on too long and the hosts just talk and talk or worse, don't talk at all and just show you a computer screen as they scroll around.

My first official video is about my recommendation for a solder tip cleaner. It's the one I use in my own lab and its quite inexpensive but works great. I set up a small lab in my garage next to my Davinci 3D printer. It makes a nice recording area.
Picture
The featured product is the solder tip cleaner shown to the left. It's heavy weight, non-skid bottom and brass shavings make it ideal for cleaning tips. 

I've used so many sponges and light weight cleaners before only to find out they didn't work as well. So I'm trying to save the beginner's out there a little time and hassle based on my experience.
If you like what you see in the video, please subscribe to my channel on YouTube. I'll be posting more and will be coordinating topics with the blog here as well. I want them to compliment each other not compete for your attention. If you have a topic you'd like to see, shoot me a suggestion through my contact page.
0 Comments

3D Printed Box for Electronics

8/3/2014

3 Comments

 
I'm always on the lookout for new 3D printed box designs. I like to learn from others concepts and figure out which designs work the best to hold a circuit board, switches and any type of display or LED panel. On the Adafruit YouTube channel I found the Mini OONTZ Midi Controller. I have absolutly no interest in a Midi controller but I thought the box design was very well done so I downloaded it from the thingiverse site and printed it on my Davinci 3D printer.
Picture
Mini OONTZ Midi Controller
Picture
Bottom
Picture
Center Box Section
Picture
Top
I printed the top and bottom together but the center box just wouldn't quite fit. I should have printed each piece separate because the edges of the heat bed don't seem to have a balanced heat level so the edges warped bit on the top cover because it was too close to the edge of the heated bed.
Picture
My finished box
The results were quite good though considering the slight warpage of the top. And because the top and bottom were printed a with the exposed side on the heated bed, they each came out smooth.

I printed the center box section with supports so the screw tabs and the holes on the side of the case would print correctly without sagging. A little bit of scraping on the support structure made that an easy removal. I printed all pieces in excellent mode which is 0.2mm at 30% fill.


The box is held together with self taping machine screws with an angled counter sunk head. The box has counter sunk holes to allow the screws to fit flush to the top and bottom surface. The finished box is above. The rounded corners of the box are a nice feature and the screw design for holding the pieces together is solid. I could have cleaned my print up a little with some sandpaper and acetone but frankly it turned out quite nice the way it was. I plan to use this type of design for future boxes. 
3 Comments

    Sponsors


    Picture
    Picture
    Picture

    Advertise here for only $25 per month. 170x50 pixel add with graphics (similar to Howtronics above). 
    Contact us at our contact form for more detail.

    Categories

    All
    3D Printer
    Chipaxe
    Chipino
    Chipkit
    CNC
    Copper Connection
    Dot Matrix
    Elproductsnews
    Expresspcb
    Graphic Lcd
    Great Cow Basic
    Kickstarter
    Lcd Shield
    Makefaire
    Makercase
    Maximite
    Microchip Pic
    Pickit 2
    Pickit 3
    Videos

    Visit previous blog posts in the archives below.

    Archives

    February 2018
    October 2017
    September 2017
    July 2017
    November 2016
    August 2016
    July 2016
    May 2016
    March 2016
    January 2016
    November 2015
    September 2015
    August 2015
    July 2015
    June 2015
    April 2015
    March 2015
    February 2015
    January 2015
    December 2014
    November 2014
    October 2014
    September 2014
    August 2014
    July 2014
    June 2014
    May 2014
    April 2014
    March 2014
    February 2014
    January 2014
    December 2013
    November 2013
    October 2013
    September 2013
    August 2013
    July 2013
    June 2013
    May 2013
    April 2013
    March 2013
    October 2012
    October 2011

    RSS Feed


    About Chuck

    Chuck has been programming with PIC Microcontrollers since there were only five devices. Now there are over 700 and growing. He also has a lot of fun 3D printing designs using his Davinci 3D printer and TinkerCad software. In this series of blog posts and occasional videos on his YouTube Channel he tries to help you get started with electronics and 3D printing.

    Disclaimer

Powered by Create your own unique website with customizable templates.