Electronic Products
Find us here:
  • Books
    • Embedded C Books >
      • cbookfiles
      • cbook2files
      • cbook3files
    • BASIC Books >
      • Programming PICs in BASIC_vol1
      • PICBasic Book Support
      • Basic Atom Book Support
    • Other Books >
      • Arduino Book
      • chipkitbookfiles
  • Chuck's Blog
    • Blog Posts Archive
    • Disclaimer
  • YouTube Channel
  • About Chuck
    • About Chuck
    • Stock Car Racing
  • 3D Printing
    • Fabrikator Mini
  • Getting Started with PICs
    • BASIC Programming
    • C Programming >
      • C Compilers
  • Build Your Own PICKit 2
    • PICkit 2 Starter Kit
  • CHIPINO
    • Shields
  • CHIPAXE Breadboard Modules
  • Understanding Hex Files
  • chipKIT
  • Newsletter Archive
  • Contact
  • Retired Designs
    • BasicBoard
    • Ultimate OEM
    • Maximite BasicBox
    • Maximino
  • Downloads
  • Kickstarter Projects
    • Demo-Shield
  • Great Cow Basic Site
  • Buy Hardware
  • Links I Recommend

2D to 3D - Making text into 3D print

9/25/2014

0 Comments

 
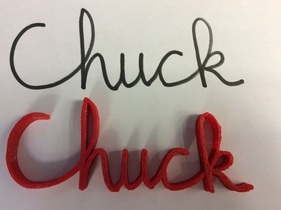
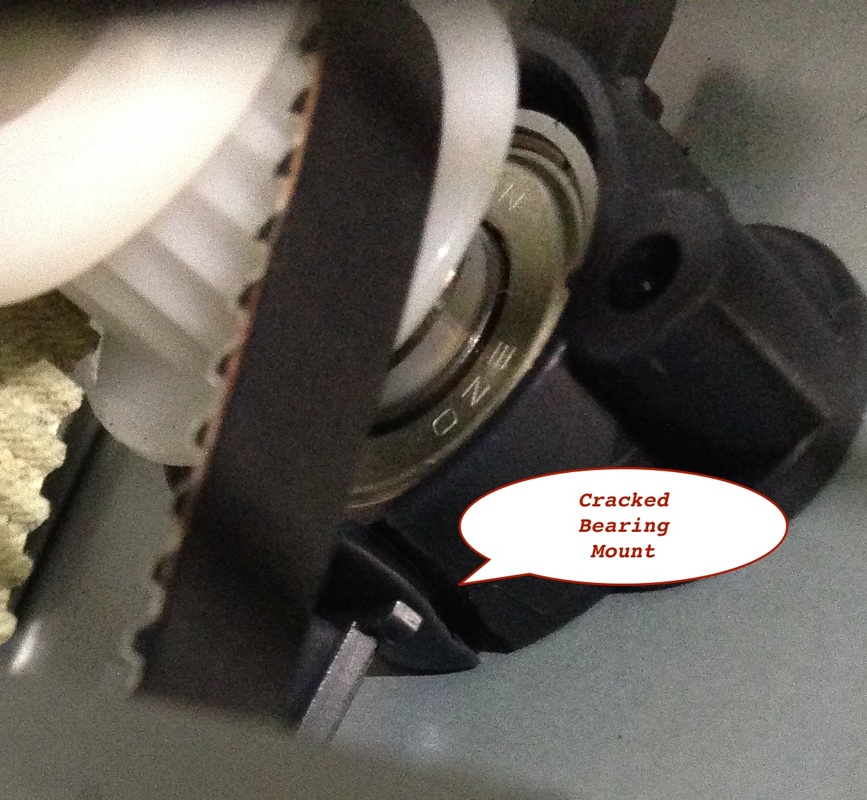
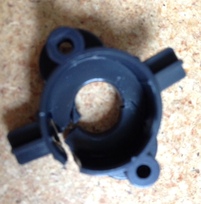
Have you ever wanted to just draw something and then print it out in 3D? Well that's what I show you in my latest YouTube video for my 3D print series. I used this method before to reproduce a Valence Clip by scanning the object in, but I decided to just try a simple phrase (in this case my name) written on white paper with a black marker.
Picture
The YouTube video below and also at my Channel, takes you step by step through the process which is quite easy. I use some software tools on my Mac for editing but if you are good with photoshop or some other image editing tool, those may work even easier.
The whole point is the simplicity of Tinkercad and the Davinci 3D printer make this something anybody could do quickly. In my opinion, that is the secret sauce to a breakout of 3D printing into everyones home; we need to make it simpler. When software for the 3D printers get so easy I can just draw and send to my 3D printer then things will start to take off. Or when I can scan at one 3D printer and it sends the file through the internet to another 3D printer 1000's of miles away to print automatically, then we'll have the 3D fax machine. How interesting will that be?
I think we are getting closer everyday.
0 Comments

Davinci 3D Bearing Mount Replacement

9/20/2014

0 Comments

 
I finally replaced the broken bearing mount on my Davinci 3D printer. I tried to print a large plastic bolt and nut but the results were not good. The shape of both were oval rather than round. This indicated the broken bearing mount was affecting the operation. XYZprinting had sent me a replacement bearing mount a few blog posts ago but I held off replacing it until necessary and this was it.
Picture
Picture
I couldn't find any instructions or videos explaining how to do it so I made a video myself for anybody that may have to do the same. I posted it on my YouTube Channel so anybody can follow along. There may be a better way to do it but what I did worked pretty well.
There is a replacement bearing mount that thinigverse user bret4 designed and posted on Thingiverse here. I can now print a few of these so I have backups for the future. I'm sure I'll break another at some point in the future. My printer doesn't spend much time idle. I'm always finding something to print. 
0 Comments

Rubbermaid Mailbox Flag 3D Print

9/13/2014

1 Comment

 
For my latest YouTube Channel Video / 3D Printed Project, I created a replacement flag for my Rubbermaid mailbox. This mailbox is super strong and has lasted a long time but the flag design is the weak point. It can break-off easily especially when snow gets deep on top and someone tries to clear it off, often breaking the flag.
Picture
Picture
So I put TinkerCad to work and designed a replacement. I got the dimensions from the shaded outline left from the sunlight on the box. I designed it to snap in place but be tight enough to hold any position. Check out the details in the video below.
Overall the design worked great. I actually made three prototypes. Each worked fine but I made minor improvements to end up with the one in the video. These things are hard to find so I may make them available for purchase somewhere for those that don't have a 3D printer. The .stl file is available at my Thingiverse page.
1 Comment

Programming Microchip PICs Made Easy

9/11/2014

5 Comments

 
I've been doing a lot of 3D printing lately but in the background I'm working on new books. One of them is an update to my Beginner's Guide to Embedded C Programming series. In the first series, I used MPLAB, HI-TECH C Compiler, PICkit 2 programmer and a PIC16F690. All those have been replaced. MPLAB X, XC8 Compiler, PICkit 3 programmer and the PIC16F1xxx family of enhanced mid-range devices. Something else changed recently which has me delaying my book, MPLAB Code Configurator (MCC).
Picture
MCC was in beta for a while but is now released and already on version 2.1, and it is awesome. With a few clicks of the mouse you can build a whole project of code (see it in the video below). Each peripheral is reduced to a set of check boxes or drop down menus. I/O can be configured with a GUI version of the chip. Even the main.c file can be generated. And the best part.....
.....all the code generated includes a library of functions for each peripheral written in XC8 code. Even I/O has its own set of functions such as:

RB0_SetHigh() 
RB0_SetLow()   
RB0_Toggle()  
RB0_GetValue()
RB0_SetDigitalInput()  
RB0_SetDigitalOutput()   
RB0_SetPullup()    
RB0_ResetPullup()   
RB0_SetAnalogMode()   
RB0_SetDigitalMode()

And these are just the I/O functions for the RB0 pin. And the function code is open source so you can see how its done. Great for learning.
It does the same for SPI, I2C, Timers, etc. You could take a module like the CHIPINO with fixed pinouts, install a PIC16F1936 (instead of PIC16F886), setup all the peripherals and connections to the I/O and then build the code. You'll have a main.c file with configurations set and ready for your custom code along with a library of functions for all the peripherals in the device. 

You basically just created your own Arduino style module from a CHIPINO. And you have debug capability through the PICkit 3, full access to the configuration to run slower speeds or faster speeds. And when you are done, unplug the PIC16F1936 and do it again for some other blank 28 pin PIC with different features. And because you don't need a custom bootloader device, you can use any PIC supported by MCC. And that list is growing with each release.

So stay tuned for more as I work this into my new series of books. Writing C code for PICs just got so easy. I cannot say that enough.


5 Comments

Net Neutrality Support

9/10/2014

0 Comments

 
Picture
How irritating is that picture above? Could this be our experience if the cable and phone companies are allowed to separate the internet into a two speed system? The idea that the internet should be equal access for all is the idea behind Net Neutrality. We support the cause today as its another:

Sept. 10th - Internet Slowdown Day

John Oliver Explains Net Neutrality
0 Comments

3D Printed Canon Printer Paper Tray

9/7/2014

0 Comments

 
My Canon MG3520 printer is a great paper printer but the tray to catch completed prints is way to short. It only measures 5 1/4" fully extended. This leaves all my prints on the floor and if there are no page numbers, I'm left with a puzzle to figure out how to put them back together in proper order.
Picture
Picture
Picture
So I decided to improve the design and make a new paper tray to collect the prints. I removed the original tray and measure the width and the thickness of the rails. Then I used TinkerCad to create a much bigger tray. I extended it to about 7" which was just slightly smaller than the max size my Davinci 1.0 printer could handle. I slid the new tray in place and problem solved. Check out the video below from my YouTube Channel for the step by step instructions.
I continue to find uses for my 3D printer. It's so handy to have in the shop. I can work on my books or electronics projects while it prints my latest design. Bigger jobs that take time, I can run at night and in the morning they are ready to use. I'm seriously thinking about getting a second one because I have more print ideas than I have time to print. 

The file for this print is on my Thingiverse page: http://www.thingiverse.com/thing:455476
0 Comments

PIC Programmer History

9/4/2014

0 Comments

 
I released a new video on my YouTube channel for those setting up a home lab and who may want a little help choosing a PIC Programmer. I actually go back to the first hobbyist PIC programmer called the PICSTART 16B1 and then take the viewer through some of the most popular PIC programmers in history to get us to where we are today.
Picture
Picture
Picture
By no means did I cover every design, just the highlights from my years of experience. There are still many designs out there so it can be confusing but in the end I recommend sticking with the official PICkit programmers, though building your own like my PK2 is fun and you can learn a lot.
The video is short but hopefully viewers like it enough to subscribe and let me know they are watching and hoping for more. I plan to release future videos in three categories; 3D print projects, beginner electronic projects and tips for the home lab. Check it out and let me know your ideas for what you'd like to see in a future video.
0 Comments

3D Printed Solder Spool Bracket

9/2/2014

0 Comments

 
When I first bought my Davinci 1.0 3D printer, I actually wondered if I would find enough stuff to print to justify the purchase. I've owned it for about 4 months and the thing has been running non-stop and I have a backlog of projects to print. I have some designs that I print for resale and it's helping to fund a potential 2nd 3D printer. I need the extra capacity so I can print my own designs while I print designs for other people. One of the latest prints for hire was a Solder Roll Bracket that mounted to a pegboard wall. One of our sponsors, gamersoption.com, needed 8 of these built-up for their ever expanding production line of XBOX and PlayStation Custom Modded Controllers.
Picture
Picture
They sent me a starting design, which was created in TinkerCad, which was a simple L Bracket with a post sticking out to hold the solder roll. From there I went to work modifying it to fit the pegboard wall that was at the back of their assembly work benches. I added a triangular strengthening support and also posts to line up with the holes in the pegboard. A hole was added to the original L bracket so they could install a screw and nut. One prototype run and the design was proven to work great.
I then when to work printing a batch of them, eight to be exact. The design was agreed to be open sourced so you can get it at Thingiverse. I produced a YouTube video showing how the design was done so if you get a chance, check it out above or at this YouTube link.
0 Comments

    Categories

    All
    3D Printer
    Chipaxe
    Chipino
    Chipkit
    CNC
    Copper Connection
    Dot Matrix
    Elproductsnews
    Expresspcb
    Graphic Lcd
    Great Cow Basic
    Kickstarter
    Lcd Shield
    Makefaire
    Makercase
    Maximite
    Microchip Pic
    Pickit 2
    Pickit 3
    Videos

    Visit previous blog posts in the archives below.

    Archives

    February 2018
    October 2017
    September 2017
    July 2017
    November 2016
    August 2016
    July 2016
    May 2016
    March 2016
    January 2016
    November 2015
    September 2015
    August 2015
    July 2015
    June 2015
    April 2015
    March 2015
    February 2015
    January 2015
    December 2014
    November 2014
    October 2014
    September 2014
    August 2014
    July 2014
    June 2014
    May 2014
    April 2014
    March 2014
    February 2014
    January 2014
    December 2013
    November 2013
    October 2013
    September 2013
    August 2013
    July 2013
    June 2013
    May 2013
    April 2013
    March 2013
    October 2012
    October 2011

    RSS Feed


    About Chuck

    Chuck has been programming with PIC Microcontrollers since there were only five devices. Now there are over 700 and growing. He also has a lot of fun 3D printing designs using his Davinci 3D printer and TinkerCad software. In this series of blog posts and occasional videos on his YouTube Channel he tries to help you get started with electronics and 3D printing.

    Disclaimer

Powered by Create your own unique website with customizable templates.