Electronic Products
Find us here:
  • Books
    • Embedded C Books >
      • cbookfiles
      • cbook2files
      • cbook3files
    • BASIC Books >
      • Programming PICs in BASIC_vol1
      • PICBasic Book Support
      • Basic Atom Book Support
    • Other Books >
      • Arduino Book
      • chipkitbookfiles
  • Chuck's Blog
    • Blog Posts Archive
    • Disclaimer
  • YouTube Channel
  • About Chuck
    • About Chuck
    • Stock Car Racing
  • 3D Printing
    • Fabrikator Mini
  • Getting Started with PICs
    • BASIC Programming
    • C Programming >
      • C Compilers
  • Build Your Own PICKit 2
    • PICkit 2 Starter Kit
  • CHIPINO
    • Shields
  • CHIPAXE Breadboard Modules
  • Understanding Hex Files
  • chipKIT
  • Newsletter Archive
  • Contact
  • Retired Designs
    • BasicBoard
    • Ultimate OEM
    • Maximite BasicBox
    • Maximino
  • Downloads
  • Kickstarter Projects
    • Demo-Shield
  • Great Cow Basic Site
  • Buy Hardware
  • Links I Recommend

Tablet for Programming PICs

12/23/2014

1 Comment

 
I've always wanted a low cost way to program PICs and a tablet seemed like a great solution. But most tablets either didn't have a USB port for the programmer or ran an operating system that didn't support the software tools I like to use such as Great Cow Basic and PICkit 2 software. Then I found the Winbook tablets at Microcenter. They offer a very low cost tablet that runs a full version of Windows 8.1 and has as full size USB port. On the smaller ones they are a USB 2.0 and on the larger versions they offer USB 3.0.
Picture
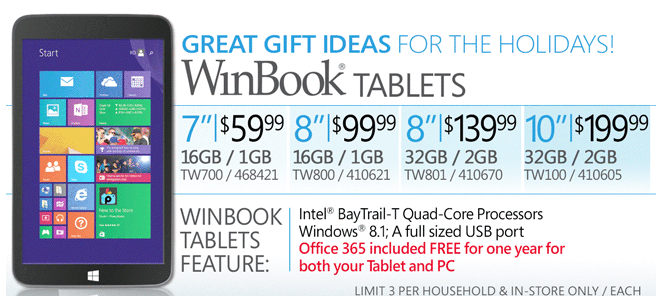
The pre-Christmas deals offered the smallest 7" Winbook for $59.95. It included Windows 8.1, 16GB of Flash Storage and 1GB of RAM. It also has wireless-N and a micro-HDMI port. So I bought one and downloaded the Great Cow Basic IDE at my Greatcowbasic.com site. I then ran the software without issue. The next step was to test the PICkit 2 on the USB port. This worked smoothly as the GCB IDE has the PICkit 2 command line interface built in. The programmer launched and programmed a PIC16F886 on a CHIPINO module without issue. 

I did find that 8GB of the 16GB was taken up by the operating system and other features so the memory size is limited, but plenty for what I was doing, at least I thought so. Then I decided to see if the Davinci 3D printer software, XYZware, would run on it. I downloaded that and it ran fine. I could load a 3D print into my Davinci without issues and the print was launched. My next step was to try and install the ExpressPCB software I like to use for creating circuit boards. Before I did that, I decided I needed a keyboard and mouse first. I tried a bluetooth keyboard but I couldn't it them to connect so I used a USB expander and was able to connect the PICkit 2, USB Keyboard and USB mouse to the tablet and everything worked great.
I also wanted to to see if I could load Chrome on the tablet so I could modify Tinkercad designs but I found the memory usage was already getting low. Seems that Windows did an update and used up a bunch of space. I have to figure out what I can do to get some of that back but my idea of installing ExpressPCB may not be possible either. I guess 16GB isn't enough space. The 32GB is $139.95 but as the price gets higher I may just stick with a low cost laptop. The tablet has a microSD card slot so I'm going to try and load the programs on there and see if I can run everything from the SD card. So I've achieved one goal of programming PICs with a tablet but to create designs, write the software, send the 3D print file for a complete design from a tablet will require more memory with the SD card if that works or spend more money on a larger tablet which is not what I want to do. But at least I know its possible at the simplest of all levels. I can write a Great Cow Basic program and program a CHIPINO module with the code. Not bad at all for $59.95. 
1 Comment

Corrected PK2 Schematic

12/7/2014

0 Comments

 
A reader of this blog, Frans Stevens, pointed out that the schematic for my Build Your Own PICkit 2 schematic had an error. The USB connections to D+ and D- were backward. I quickly looked over the schematic and also the PCB layout because I've built many of these and they all worked. But I found out he was right, the schematic was wrong. Luckily the PCB was correct and that is why all my PK2 programmers work fine.
Picture
Corrected Schematic
Pin 2 of the USB needs to connect to D- and pin 3 needs to connect to D+. I had them backwards in the schematic. So I immediately updated the schematic and uploaded to the Build Your Own PICkit 2 page. Its awesome to have such supportive readers with the willingness to share any errors they find. I want my information to be accurate but I'm human and do make mistakes. Thanks Frans.
0 Comments

    Categories

    All
    3D Printer
    Chipaxe
    Chipino
    Chipkit
    CNC
    Copper Connection
    Dot Matrix
    Elproductsnews
    Expresspcb
    Graphic Lcd
    Great Cow Basic
    Kickstarter
    Lcd Shield
    Makefaire
    Makercase
    Maximite
    Microchip Pic
    Pickit 2
    Pickit 3
    Videos

    Visit previous blog posts in the archives below.

    Archives

    February 2018
    October 2017
    September 2017
    July 2017
    November 2016
    August 2016
    July 2016
    May 2016
    March 2016
    January 2016
    November 2015
    September 2015
    August 2015
    July 2015
    June 2015
    April 2015
    March 2015
    February 2015
    January 2015
    December 2014
    November 2014
    October 2014
    September 2014
    August 2014
    July 2014
    June 2014
    May 2014
    April 2014
    March 2014
    February 2014
    January 2014
    December 2013
    November 2013
    October 2013
    September 2013
    August 2013
    July 2013
    June 2013
    May 2013
    April 2013
    March 2013
    October 2012
    October 2011

    RSS Feed


    About Chuck

    Chuck has been programming with PIC Microcontrollers since there were only five devices. Now there are over 700 and growing. He also has a lot of fun 3D printing designs using his Davinci 3D printer and TinkerCad software. In this series of blog posts and occasional videos on his YouTube Channel he tries to help you get started with electronics and 3D printing.

    Disclaimer

Powered by Create your own unique website with customizable templates.