I tested the mini B connector in the board and it fit fine. This was the major change to the board in addition to removing the power plane on top and replacing it with a 0.020" trace. So it looks like it will work but the real test will be when I solder it together and see if it can program a PIC. That will be the ultimate test. I'll update you on that in a future post.
In my March 24th blog post I talked about ordering an updated version of my PICkit 2 clone board from ITEAD studios back on March 13th. On March 18th I was emailed that they were shipped. By my blog post the boards were still in transit. They arrived today on the 28th so I can compare them to the originals from ExpressPCB. 10 days for shipping via air mail wasn't too bad. 
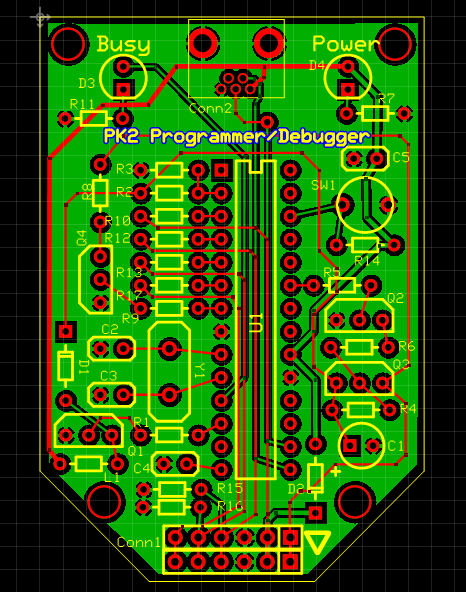
I haven't built one up yet but I am impressed with the quality of the board. In the picture above you can see the ITEAD board on the left and the original ExpressPCB board on the right. First thing to notice is the shape. To get the low cost $85 for three prototype board service from ExpressPCB I had to order in a 2.5 x 3.8 panel. I ended up squeezing in another board design to use up the extra space but it all required me to cut out the board. The ITEAD board was routed out for me for $20 and I have 10 of them instead of three. Next I looked at the silkscreen and the ITEAD is brighter and easier for my old eyes to read. The solder mask is a little brighter green as well but that really doesn't matter. The board is hot air solder leveled (HASL) on all the pads and they look real good and should be easy to solder.
I tested the mini B connector in the board and it fit fine. This was the major change to the board in addition to removing the power plane on top and replacing it with a 0.020" trace. So it looks like it will work but the real test will be when I solder it together and see if it can program a PIC. That will be the ultimate test. I'll update you on that in a future post.
0 Comments
I've put together an explanation for Understanding Microchip PIC .hex files many times but when I need it I can't find it. I'm just not organized enough. That is a big part of the reason I've built this website. I now have an online place to store my notes about programming Microchip PICs and all my supporting projects right here in one place. So I put together a detailed summary of how to analyze and understand a .hex file once again and gave it its own page. Its on my site now for everyone to view. Check it out and let me know if this helps you in any way. I didn't want to make it too long like some summaries I've seen, but I think I covered the topic well enough to help you understand it. People who want to create their own bootloader for PICs will need to understand this file format so maybe someone will gain from this post. If you do find this post or any of my blog posts helpful, then help out this site by supporting our sponsors, or clicking on the ad below. I also have an Amazon store now with stuff I recommend. Purchase through my AStore and you pay the same price but Amazon sends me a small royalty. Thanks. I created a modified version of my PK2 programmer design (which is based on the open source Microchip PICkit 2 design). I removed the power plane and replaced it with a series of 0.020" traces. I also added the option to use a Mini B USB connector. In the past I've used the ExpressPCB $85 prototype service to get three 2.5" x 3.8" boards with silkscreen and soldermask. But there are many different choices to get cheaper prototypes if I have the gerber files. As I've mentioned, in a previous post, CopperConnection imports ExpressPCB files and can export gerber files. I did this and sent the boards to ITEAD Studio. Several people told me they had great success with them but they are a lot slower than the ExpressPCB service because of the shipping time. Since saving money was more important than speed in this case I decided to try it. You have to select the service and then buy it based on the size of the board. I selected the 2Layer process for 5cm x 10cm board. It cost just over $20 with shipping for 10 boards. I could only get three boards out of the ExpressPCB option so this already was an advantage. The ITEAD option works out to just over $2 per board versus $28 for ExpressPCB. So the $85 versus $20 is a savings of $65. Since CopperConnection Studio edition for $50 is required to get the gerbers, this one order makes the CopperConnection investment well worth it. After you order and pay for the boards. you will receive an email asking you to send in ...
I'm planning on launching a Video Blog soon and in the process have tried various different tools for creating special effects. One I found was the Animate It app for iPad. Its from the people that gave us the Wallace & Gromit stop action videos. It is a lot of fun to play with though I don't know how useful it is for a video blog since I can just speed up a video if I want to get through a section quickly. So I figured I'd share this little test video with my audience and let you be memorized by the building of a CHIPINO module kit. I needed one for a project so two birds with one stone. I have another PK2 programmer update for you. My PK2 design just got a little better. I wanted to try out the new PIC16F1788 in a CHIPINO module because I noticed that Great Cow Basic Compiler supported it. But I quickly realized that the latest device file for PICkit 2 didn't support it. So it gave me reason to try out the Device File Manager by user name Dougy83. The device file manager is a great tool for updating the Device file for PICkit 2 (and my PK2). I used a PIC16F1784 which was supported and made a copy within the tool. Then I downloaded the PIC16F1788 programming spec to get all
I started a "Links I Recommend" page on my site to hold all the links I use and recommend often. I can't believe I didn't do this before and the list is just getting started. I have a lot to add to it. If you have a link you would recommend I add, then send me it through my contact page. I check it out and if I like it I'll add it. It has to be related to building electronics but I'll consider anything if you have a good reason. I plan to add
|
Categories
All
Visit previous blog posts in the archives below.
Archives
February 2018
About ChuckChuck has been programming with PIC Microcontrollers since there were only five devices. Now there are over 700 and growing. He also has a lot of fun 3D printing designs using his Davinci 3D printer and TinkerCad software. In this series of blog posts and occasional videos on his YouTube Channel he tries to help you get started with electronics and 3D printing. Disclaimer |