Electronic Products
Find us here:
  • Books
    • Embedded C Books >
      • cbookfiles
      • cbook2files
      • cbook3files
    • BASIC Books >
      • Programming PICs in BASIC_vol1
      • PICBasic Book Support
      • Basic Atom Book Support
    • Other Books >
      • Arduino Book
      • chipkitbookfiles
  • Chuck's Blog
    • Blog Posts Archive
    • Disclaimer
  • YouTube Channel
  • About Chuck
    • About Chuck
    • Stock Car Racing
  • 3D Printing
    • Fabrikator Mini
  • Getting Started with PICs
    • BASIC Programming
    • C Programming >
      • C Compilers
  • Build Your Own PICKit 2
    • PICkit 2 Starter Kit
  • CHIPINO
    • Shields
  • CHIPAXE Breadboard Modules
  • Understanding Hex Files
  • chipKIT
  • Newsletter Archive
  • Contact
  • Retired Designs
    • BasicBoard
    • Ultimate OEM
    • Maximite BasicBox
    • Maximino
  • Downloads
  • Kickstarter Projects
    • Demo-Shield
  • Great Cow Basic Site
  • Buy Hardware
  • Links I Recommend

Davinci 3D Update - Extruder Warranty

6/20/2014

10 Comments

 
It didn't take long to get a response from XYZ Printing (the manufacturers of the Davinci 3D 1.0 printer). I sent an email to the address on the warranty card and within 6 hours had a response. The first response had me check the connectors to make sure they weren't disconnected. They sent a picture to show me what to check. Mine were in place. I even took some voltage measurements at each connector. 0.018 Vdc at the top and 2.22 Vdc at the bottom.
Picture
The next email came the following morning asking me to send them the sales invoice, which I got from Amazon, and also my contact info and shipping address. I suspected I was going to get a replacement extruder but no mention of that yet since they apparently needed to verify I bought it new. I sent the info and then waited another few hours. The next email included their shipping address and asked me to send them the Extruder Nozzle. I was a little confused because to me that sounded like just the brass nozzle so I asked for a picture of what they wanted sent and they sent a picture showing the whole extruder unit. And so the fun began.
Picture
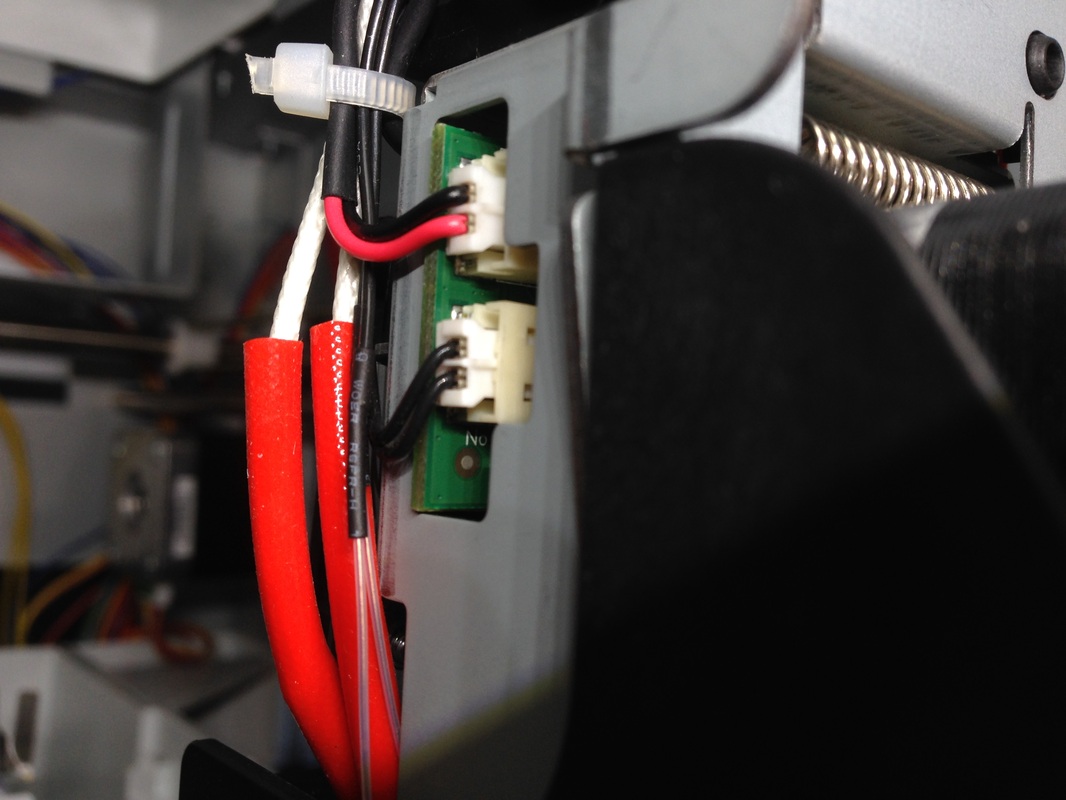
There is a video on the XYZ Printer site that shows how to remove a piece of stuck plastic, which I have already done before but this one had the full line still in place. I tried pulling out the plastic from the top but it wouldn't release because the nozzle was cold. So I pulled the release clip to release the whole extruder and had to fight against the plastic line to get the unit out far enough so I could cut the plastic line. In the process I slightly bent the bracket above the extruder. It was easily put back in place. I cut the line just above the black guide and then the unit came out with a little wiggling. I had then had to cut one tie strap on the heater cable and then disconnect the heater element connector. From there the extruder was out ready to be shipped. 
Now it would have been nice to have the new extruder first so I could just put the new one in while I still knew what needed to be connected. It also would have eliminated half the delay in shipping out and back. I'll also have to remember the steps when the new one comes. I learned a little bit more about the printer in the process though.

On the circuit board is a infrared detector pair (one led and one sensor). This is used to monitor the amount of plastic being used. I'll cover that in more detail in a future post. For now, I'm off to ship the extruder so I can hopefully get my Davinci 3D up and running again real soon.

In the future I also hope they offer parts for sale because after 180 days my warranty is up. It looks like the heater element is just held in place by a set screw. Assuming that is the root of the failure, I could have replaced that for a lot less money. So far though, XYZ has been responsive and helpful. I appreciate the support I'm getting.
10 Comments
Jon
11/7/2014 10:47:10 pm

I have had my exturder replaced three times. I finally figured out the problem is the cheap connector on the heavy white cable. The cable gets too warm causing a short where it meets the connector. The last go around with the XYZ they tried to have me pay return shipping to have it replaced. After showing them the Amazon invoice and refreshed their memory with the three (3) RMA I have had in less then six (6) months, they paid for shipping. However it appears they used the same cheap connector.

Reply
Chuck Hellebuyck link
11/8/2014 08:17:16 am

Thanks for the post.
Did you take pictures so we can see the failure and know what to look for?

Reply
Josh
12/9/2014 03:50:49 am

The heater elements will slide out and you can insert a new one. They are very cheap. Here is one for less than $2.00

"12V 40W Ceramic Cartridge Heater for 3D Printer Prusa Mendel 1m"
http://www.ebay.com/itm/181218124256?_trksid=p2060778.m1438.l2649&ssPageName=STRK%3AMEBIDX%3AIT

Reply
Mark
12/20/2014 08:29:23 pm

I had the problem where the extruder didn't get hot , the cause were the black plug it wasn't having a tight fit inside the female one so the current wasn't flowing , I just replaced bot plugs with this http://www.inseparabile.it/public/forum/peppe96/2010124222753_images.jpeg , problem solved.

Reply
Adam link
3/9/2015 11:16:12 pm

I CAN'T BELIEVE HOW MUCH OF A PIECE OF SHIT THIS PRINTER IS, IT HAD THE DREADED 0011 ERROR I AM GOING TO CONTACT THE COMPANY SINCE IT HASNT WORKED SINCE. I PURCHASED THIS LAST WEEK AFTER TWO PRINTS IT STOPPED THIS SUCKS

Reply
Chuck Hellebuyck link
3/10/2015 06:36:07 am

I showed how to fix the 0011 error in this YouTube video:
http://youtu.be/xyn6TOsemqI

Reply
Adam
4/5/2015 02:42:10 pm

Yes you did Chuck but the problem is you showed how to fix the issue on the 1.0 not the 1.0a which is a different problem. The new board uses a resistor as a fuse and once this blows you need to bridge a connection and add an in line fuse yourself. Which still sucks for something which i purchased brand new.

stuart
6/19/2015 10:20:05 am

mine appears to be having the problem with the motherboard as well, I wish someone would do a youtube video on what you have to do to fix the resistor in the motherboard and how to check it. I have checked everything else and it tests out fine

Reply
Cliff
1/17/2016 12:11:17 am

Chuck. I have really enjoyed your videos on you tube very informative. I had this issue with the cheap black connector a month into owning my printer. I simply replaced the black connector with automotive style male female clips. Haven't had a problem with it since.

Reply
Steve Raymond
4/15/2016 07:13:44 pm

DOESE ANY ONE KNOW WHERE YOU CAN BUY JUST THE THERMISTER FOR THE AIO 1.0 DAVINCI

Reply


Leave a Reply.


    Categories

    All
    3D Printer
    Chipaxe
    Chipino
    Chipkit
    CNC
    Copper Connection
    Dot Matrix
    Elproductsnews
    Expresspcb
    Graphic Lcd
    Great Cow Basic
    Kickstarter
    Lcd Shield
    Makefaire
    Makercase
    Maximite
    Microchip Pic
    Pickit 2
    Pickit 3
    Videos

    Visit previous blog posts in the archives below.

    Archives

    February 2018
    October 2017
    September 2017
    July 2017
    November 2016
    August 2016
    July 2016
    May 2016
    March 2016
    January 2016
    November 2015
    September 2015
    August 2015
    July 2015
    June 2015
    April 2015
    March 2015
    February 2015
    January 2015
    December 2014
    November 2014
    October 2014
    September 2014
    August 2014
    July 2014
    June 2014
    May 2014
    April 2014
    March 2014
    February 2014
    January 2014
    December 2013
    November 2013
    October 2013
    September 2013
    August 2013
    July 2013
    June 2013
    May 2013
    April 2013
    March 2013
    October 2012
    October 2011

    RSS Feed


    About Chuck

    Chuck has been programming with PIC Microcontrollers since there were only five devices. Now there are over 700 and growing. He also has a lot of fun 3D printing designs using his Davinci 3D printer and TinkerCad software. In this series of blog posts and occasional videos on his YouTube Channel he tries to help you get started with electronics and 3D printing.

    Disclaimer

Powered by Create your own unique website with customizable templates.