Electronic Products
Find us here:
  • Books
    • Embedded C Books >
      • cbookfiles
      • cbook2files
      • cbook3files
    • BASIC Books >
      • Programming PICs in BASIC_vol1
      • PICBasic Book Support
      • Basic Atom Book Support
    • Other Books >
      • Arduino Book
      • chipkitbookfiles
  • Chuck's Blog
    • Blog Posts Archive
    • Disclaimer
  • YouTube Channel
  • About Chuck
    • About Chuck
    • Stock Car Racing
  • 3D Printing
    • Fabrikator Mini
  • Getting Started with PICs
    • BASIC Programming
    • C Programming >
      • C Compilers
  • Build Your Own PICKit 2
    • PICkit 2 Starter Kit
  • CHIPINO
    • Shields
  • CHIPAXE Breadboard Modules
  • Understanding Hex Files
  • chipKIT
  • Newsletter Archive
  • Contact
  • Retired Designs
    • BasicBoard
    • Ultimate OEM
    • Maximite BasicBox
    • Maximino
  • Downloads
  • Kickstarter Projects
    • Demo-Shield
  • Great Cow Basic Site
  • Buy Hardware
  • Links I Recommend

DFRobot LCD Shield Sample Code

10/19/2013

1 Comment

 
I recently updated the SimpleC library I created in my Beginner's Guide to Embedded C Programming - Vol 3 to include an LCD routine to drive the popular DFRobot LCD shield. It took a little bit of manipulation but I think it will become the new LCD drive routine for any future projects. 
Picture
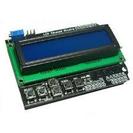
The LCD shield is CHIPINO, Arduino and chipKIT compatible but the CHIPINO pinout made the previous LCD routines impossible to use. They relied on the four data connections to the LCD to be in order (i.e. B0-B3 or B4-B7). The DFRobot shield connects to the Digital 4-7 pins on the Arduino which are PORTC pins C3-C0 on the CHIPINO. So they were in order but all data sent would be backward. 

I tried to figure out a simple way to just reverse a nibble before sending it but could not find an easy solution so I just rewrote it to individually drive each data pin and this turned out to be so easy I'm sticking with it. It also gives the advantage of allowing any four pins to be used as the data pins not just those in a row.

I didn't discover anything new since Arduino and Great Cow Basic already have that feature in their LCD routines but now I have that in the Simple C library. Now I wish PICBASIC PRO 3 had the same capability since that compiler requires the same four data bits in a row that my original SimpleC did.

Anyway, if you want the code you can download it from my elproducts.com download page and then scroll to the link below the LCD Shield picture/description to get the code. 
1 Comment
WaltF
11/15/2013 11:36:08 pm

One way to efficiently reverse the bits in a nib,
is to just populate an array as a look up table
for all the bits in reverse order, then use
the non-reversed nib to index into the array.
There are only 16 values to index, so unless
you are really tight on variable storage,
no problem

Reply


Leave a Reply.


    Categories

    All
    3D Printer
    Chipaxe
    Chipino
    Chipkit
    CNC
    Copper Connection
    Dot Matrix
    Elproductsnews
    Expresspcb
    Graphic Lcd
    Great Cow Basic
    Kickstarter
    Lcd Shield
    Makefaire
    Makercase
    Maximite
    Microchip Pic
    Pickit 2
    Pickit 3
    Videos

    Visit previous blog posts in the archives below.

    Archives

    February 2018
    October 2017
    September 2017
    July 2017
    November 2016
    August 2016
    July 2016
    May 2016
    March 2016
    January 2016
    November 2015
    September 2015
    August 2015
    July 2015
    June 2015
    April 2015
    March 2015
    February 2015
    January 2015
    December 2014
    November 2014
    October 2014
    September 2014
    August 2014
    July 2014
    June 2014
    May 2014
    April 2014
    March 2014
    February 2014
    January 2014
    December 2013
    November 2013
    October 2013
    September 2013
    August 2013
    July 2013
    June 2013
    May 2013
    April 2013
    March 2013
    October 2012
    October 2011

    RSS Feed


    About Chuck

    Chuck has been programming with PIC Microcontrollers since there were only five devices. Now there are over 700 and growing. He also has a lot of fun 3D printing designs using his Davinci 3D printer and TinkerCad software. In this series of blog posts and occasional videos on his YouTube Channel he tries to help you get started with electronics and 3D printing.

    Disclaimer

Powered by Create your own unique website with customizable templates.