Electronic Products
Find us here:
  • Chuck's Blog
    • Blog Posts Archive
    • Disclaimer
  • YouTube Channel
  • About Chuck
    • About Chuck
    • Stock Car Racing
  • Books
    • Embedded C Books >
      • cbookfiles
      • cbook2files
      • cbook3files
    • BASIC Books >
      • Programming PICs in BASIC_vol1
      • PICBasic Book Support
      • Basic Atom Book Support
    • Other Books >
      • Arduino Book
      • chipkitbookfiles
  • 3D Printing
    • Fabrikator Mini
  • Getting Started with PICs
    • BASIC Programming
    • C Programming >
      • C Compilers
  • Build Your Own PICKit 2
    • PICkit 2 Starter Kit
  • CHIPINO
    • Shields
  • CHIPAXE Breadboard Modules
  • Understanding Hex Files
  • chipKIT
  • Newsletter Archive
  • Contact
  • Retired Designs
    • BasicBoard
    • Ultimate OEM
    • Maximite BasicBox
    • Maximino
  • Downloads
  • Kickstarter Projects
    • Demo-Shield
  • Great Cow Basic Site
  • Buy Hardware
  • Links I Recommend

PK2 PICkit 2 Programmer Clone Case

5/21/2014

0 Comments

 
While I wait for the servo motors to arrive for my robot arm, I decided to try and make a 3D project and print it on the Davinci 3D printer. I decided to make a case for my PK2 - PICkit 2 Clone programmer. I had played around with a 3D software called TinkerCad a year or so ago but never had a printer to test anything on, so I never got into it too deep. I fired it up again and tried to make the case.
Picture
It requires google chrome to use it and its a free online program. Its a bit clunky but I was able to figure out the basics. They have some step by step tutorials which do help but after a few of those I knew I just had to dive in and learn. 

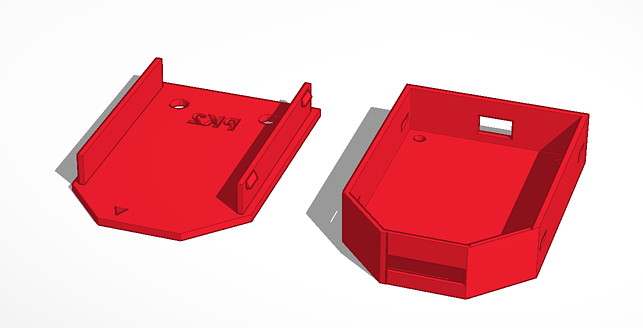
The case started with just a base and holes for the board. I thought about making standoffs but then decided to build walls around the base. That led to even taller walls and eventually a removable top. I even cut some holes in the ends to only allow the connectors to poke through. The cover has holes for the LEDs and I added letter cutouts to form the PK2 name. 

The last part was the toughest challenge. I wanted the cover to snap-in and lock itself in place. So I made little wedges on the walls of the top and holes in the sides of the bottom case that lined up. It took a couple tries but I finally got it to work. The final step was to recess my website into the top but not all the way through. Because it will be on the bottom of the print its not visible in the picture above and gravity will fight it when the printer tries to put that on the face of the cover. It's printing now as I write this so I'll see how it turns out. I'll show the final version in a future post. I'll open source the files so anyone can print the case as well.
I'm still having a lot of fun with this Davinci 3D printer.
0 Comments


Leave a Reply.

    Sponsors


    Picture
    Picture
    Picture

    Advertise here for only $25 per month. 170x50 pixel add with graphics (similar to Howtronics above). 
    Contact us at our contact form for more detail.

    Categories

    All
    3D Printer
    Chipaxe
    Chipino
    Chipkit
    CNC
    Copper Connection
    Dot Matrix
    Elproductsnews
    Expresspcb
    Graphic Lcd
    Great Cow Basic
    Kickstarter
    Lcd Shield
    Makefaire
    Makercase
    Maximite
    Microchip Pic
    Pickit 2
    Pickit 3
    Videos

    Visit previous blog posts in the archives below.

    Archives

    February 2018
    October 2017
    September 2017
    July 2017
    November 2016
    August 2016
    July 2016
    May 2016
    March 2016
    January 2016
    November 2015
    September 2015
    August 2015
    July 2015
    June 2015
    April 2015
    March 2015
    February 2015
    January 2015
    December 2014
    November 2014
    October 2014
    September 2014
    August 2014
    July 2014
    June 2014
    May 2014
    April 2014
    March 2014
    February 2014
    January 2014
    December 2013
    November 2013
    October 2013
    September 2013
    August 2013
    July 2013
    June 2013
    May 2013
    April 2013
    March 2013
    October 2012
    October 2011

    RSS Feed


    About Chuck

    Chuck has been programming with PIC Microcontrollers since there were only five devices. Now there are over 700 and growing. He also has a lot of fun 3D printing designs using his Davinci 3D printer and TinkerCad software. In this series of blog posts and occasional videos on his YouTube Channel he tries to help you get started with electronics and 3D printing.

    Disclaimer

Powered by Create your own unique website with customizable templates.