Electronic Products
Find us here:
  • Chuck's Blog
    • Blog Posts Archive
    • Disclaimer
  • YouTube Channel
  • About Chuck
    • About Chuck
    • Stock Car Racing
  • Books
    • Embedded C Books >
      • cbookfiles
      • cbook2files
      • cbook3files
    • BASIC Books >
      • Programming PICs in BASIC_vol1
      • PICBasic Book Support
      • Basic Atom Book Support
    • Other Books >
      • Arduino Book
      • chipkitbookfiles
  • 3D Printing
    • Fabrikator Mini
  • Getting Started with PICs
    • BASIC Programming
    • C Programming >
      • C Compilers
  • Build Your Own PICKit 2
    • PICkit 2 Starter Kit
  • CHIPINO
    • Shields
  • CHIPAXE Breadboard Modules
  • Understanding Hex Files
  • chipKIT
  • Newsletter Archive
  • Contact
  • Retired Designs
    • BasicBoard
    • Ultimate OEM
    • Maximite BasicBox
    • Maximino
  • Downloads
  • Kickstarter Projects
    • Demo-Shield
  • Great Cow Basic Site
  • Buy Hardware
  • Links I Recommend

Updated Look and PICkit 2 Config

4/20/2014

0 Comments

 
If you are a returning reader of this blog, then you will probably notice the updated style of the website. I wanted to make it cleaner looking and change some of the coloring to be more appealing. It also allowed me to move things around a little. Not a big change but I really like it. Hope you do too.

I was asked by a reader if the PICKit 2 firmware configuration settings were available. This is for the Build Your Own PICkit 2 project on my site. The firmware that gets programmed into the PIC18F2550 at the heart of the PICkit 2 is a .hex file that has the configuration settings encoded in. I plan to expand on my Understanding Hex Files page to add an explanation for how this is done but for now I figured I would just add the configuration settings on the PICkit 2 page.
Picture
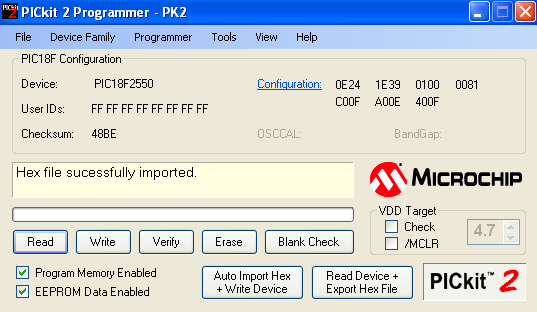
The settings are shown in the upper right hand corner of the picture above. I captured this from the PICkit 2 software. So I took an existing PICkit 2 clone and connected it to a CHIPINO module. Then installed a PIC18F2550 into the CHIPINO socket. The PICkit 2 sensed the PIC18F2550. Then I loaded the pk2v023200.hex file and the configuration was automatically loaded into the software. It shows the hex values for each Configuration register and there are more than one on the PIC18F2550.
If you click on the blue Configuration word shown in the picture above, a new screen will pop up with even more detail. I show that expanded screen shot on the Build Your Own PICkit 2 page (which is what I added recently per this post). Hopefully this will help anybody else that may need those settings when trying to build their own PICkit 2.
0 Comments


Leave a Reply.

    Sponsors


    Picture
    Picture
    Picture

    Advertise here for only $25 per month. 170x50 pixel add with graphics (similar to Howtronics above). 
    Contact us at our contact form for more detail.

    Categories

    All
    3D Printer
    Chipaxe
    Chipino
    Chipkit
    CNC
    Copper Connection
    Dot Matrix
    Elproductsnews
    Expresspcb
    Graphic Lcd
    Great Cow Basic
    Kickstarter
    Lcd Shield
    Makefaire
    Makercase
    Maximite
    Microchip Pic
    Pickit 2
    Pickit 3
    Videos

    Visit previous blog posts in the archives below.

    Archives

    February 2018
    October 2017
    September 2017
    July 2017
    November 2016
    August 2016
    July 2016
    May 2016
    March 2016
    January 2016
    November 2015
    September 2015
    August 2015
    July 2015
    June 2015
    April 2015
    March 2015
    February 2015
    January 2015
    December 2014
    November 2014
    October 2014
    September 2014
    August 2014
    July 2014
    June 2014
    May 2014
    April 2014
    March 2014
    February 2014
    January 2014
    December 2013
    November 2013
    October 2013
    September 2013
    August 2013
    July 2013
    June 2013
    May 2013
    April 2013
    March 2013
    October 2012
    October 2011

    RSS Feed


    About Chuck

    Chuck has been programming with PIC Microcontrollers since there were only five devices. Now there are over 700 and growing. He also has a lot of fun 3D printing designs using his Davinci 3D printer and TinkerCad software. In this series of blog posts and occasional videos on his YouTube Channel he tries to help you get started with electronics and 3D printing.

    Disclaimer

Powered by Create your own unique website with customizable templates.