I found a really interesting 3D print file of a single-print hinged box. Not two pieces snapped together, but rather a single print. The design was created by a user name anewsome on thingiverse. The design prints both halves of the hinge together so the 3D printer needs to be able to print very tight tolerances. The question was, would my Davinci 1.0 3D printer be up to the challenge. 
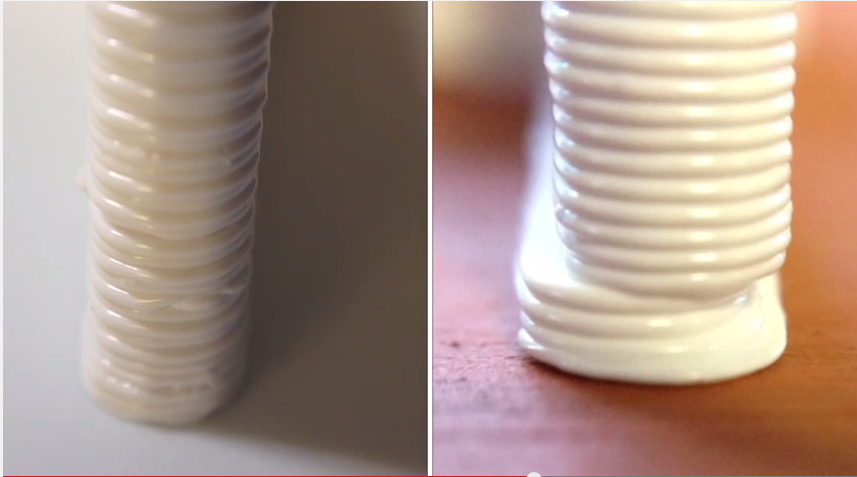
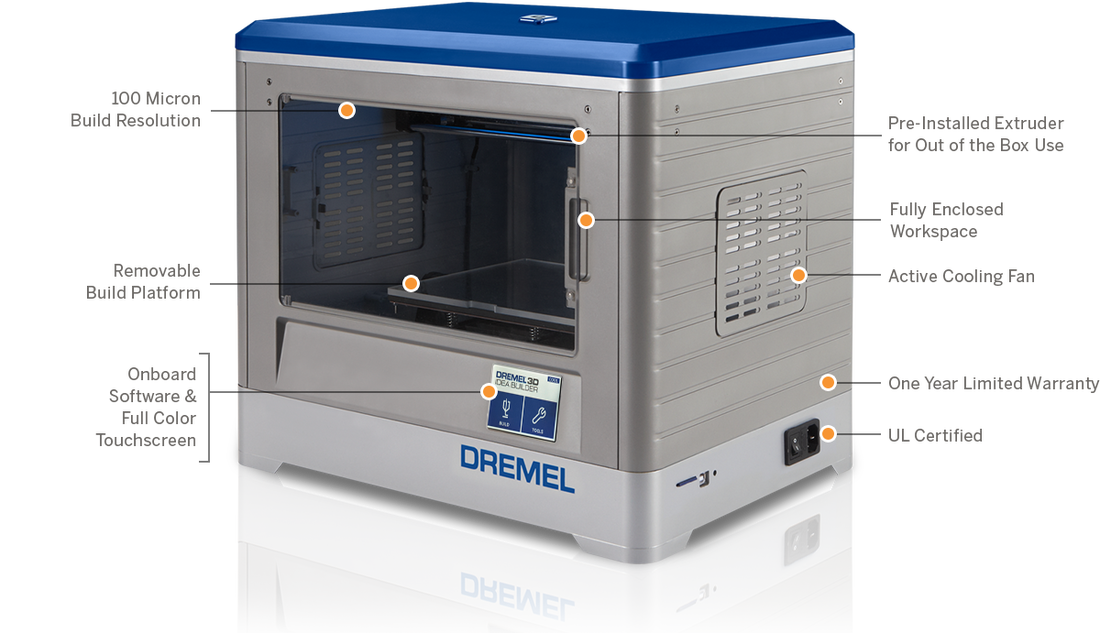
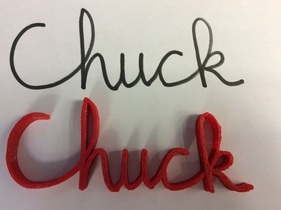
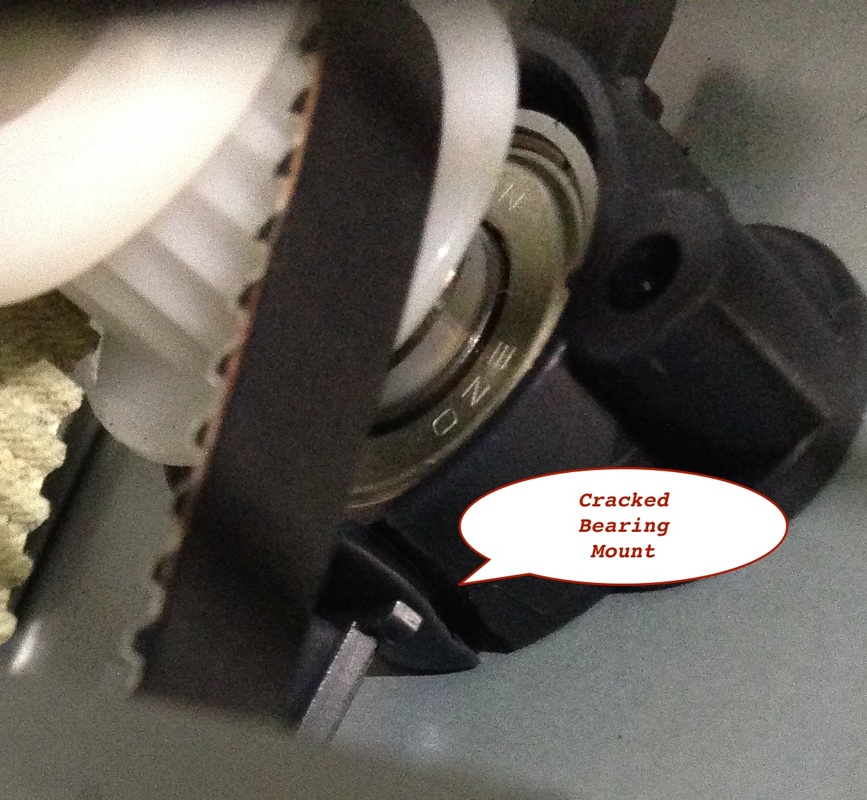
I've fixed a few flaws on my printer such as a broken bearing and a wobbly base. With that my 3D prints were coming out excellent. So my guess was the Davinci could deliver and it did. The video above from my YouTube Channel shows the steps to create the hinged box. This just shows that a low cost 3D printer can deliver as well as the higher priced units. It also shows you don't need to hack the hardware or software to get great results.
1 Comment
My father was a mechanic and later an auto body repairman who performed miracles to bring back vehicles that were smashed in traffic accidents. So I guess the fact I grew up around cars and the fact I live in the MotorCity was a natural path to get an electrical engineering degree and work for Ford. I spent a good part of my younger years working on, and racing stock cars. But somewhere along the way my electronics hobby, and profession, took over and I spent more time build circuits and writing code than I did modifying engines and fixing sheet metal. So the fact I've been spending more time with my 3D printers may not be what you come to this blog for but they will come together more as time goes on. But for now I'm just having fun learning everything I can about this interesting tool. My YouTube Channel seems to get a lot of people who build 3D projects for kids. And since as a kid I loved playing with race cars, I decided to build one for the kids out there. I used Tinkercad once again to create a Bugatti style racer but with a twist. I made it with plastic bolts that screw into the chassis. This allows the child to replace a tire the same way they change tires in a NASCAR race. And since the source files are all available on Tinkercad and also the .stl files on Thingiverse, anybody can easily recreate this. That is one of features of 3D printing that I really like. You can easily share the complete design and also easily edit it and share back. Software isn't even quite this easy. I spent the weekend creating a YouTube video showing how I made the project so hopefully it helps others learn a few tricks. I know I learn a lot from looking at others designs. I've been studying some very creative plastic cases for Arduino/chipKIT/CHIPINO style boards that people have shared on Tinkercad. From there I can easily modify them to fit my needs. So in the end, this column and my YouTube Channel will evolve to merge the 3D printing with electronics on future projects. That's when the fun will really begin. My 2nd Davinci 3D printer had an issue that I didn't see on my first one. It was shifting the prints during the build. At first I thought maybe it was the software file, but the same file built fine on my original machine. Everything pointed to a defective machine and we considered taking it back. But a little bit of investigation into the issue led to a discovery that the print bed was loose. As the video above shows, the glass on top of the heated bed was loose and could move around in its frame. This allows the print to shift as the extruder moved around. When the plastic is extruded, it sticks to the previous layer and as it moves, it would pull the print along and the loose base would move with it. This made for some really ugly prints. The bearing on the lower part of the base frame was also loose in its socket. All this caused a shifting print bed and the prints showed the crappy results. I made a few crude fixes to test out the theory that the loose bed was the culprit. To start I jammed an Exacto blade between the loose bearing and its mount. The to secure the glass top over the heated bed, I squeezed folded sandpaper between the edge of the glass and its frame. As amazingly crude as the fix was, it worked excellent. In fact the sandpaper is still in place and running well. I used epoxy to hold a broken piece of the exacto blade in place as a more permanent bearing brace. Watch the video to see more detail on this issue. Maybe it will help others who are having this issue with their Davinci. Dremel, the company that makes the famous universal hobbyist tools, recently announced their own 3D printer. This was a surprise to me as I had not heard much about it before. It's not officially released until November but they have a lot of info on their website already. After reading the specs though I was a little disappointed in the release. It only prints PLA (there are plans to make it work with ABS, but since it doesn't have a heated bed that is unlikely). Dremel tends to make nice products but this one seems about a year behind the market and a bit overpriced at $999.00. Many of the features are already incorporated in units you can buy now for far less money. It has a nice enclosure and uses what looks like standard spools of filament which would please the "I don't want to buy cartridges crowd". The bed is removable which is unique. Not sure if that is a good thing or bad. It snaps in place which is important. A loose platform, like the glass platform on the Davinci 3D printers can cause shifting in the print if it's loose (more on that in a future blog post / YouTube video). The price is just too high for me though based on what you get. You can preorder at Amazon or even Home Depot but don't expect any expertise there. (Why didn't Radio Shack get more involved in 3D printing, they clearly need better management).
A year ago $1000 for a PLA printer fully assembled in a nice case with SD card slot would have been a nice option. But now I can get a dual color Davinci Duo 2.0 for $649.95 or single color for $499 with a heated build platform and soon, cartridges to print in both PLA along side the currently released ABS. The Solidoodle will do both PLA and ABS with a heated bed in an enclosed case for $699 and both the Davinci (7.8" x 7.8" x 7.8") and Solidoodle (8" x 8" x 8") have a bigger build platform than the Dremel at 9" x 5.9" x 5.5". Printrbot Simple will do PLA printing for $349 in kit form or $599 assembled though not in a nice case and a slightly smaller platform (6" x 6" x 6"). So Dremel didn't shoot for the moon on their first printer but it appears to have a few nice features. Easily removable SD card and touch screen. The extruder looks easy to load which can be a bit of pain on some machines that don't line up the input with the extruder well. The video's on their website show tape for the platform that looks like they are pre-cut to fit the removable bed. I'd rather have a heated bed. Overall, I don't think it will be a big seller but who knows, maybe it will. I think it should have been no more than $750 and since it PLA only, really $699 would have been my max (have to give them something for the dremel name). One thing is clear, 3D printing is hitting main street in a big way. It's like watching the PC industry all over again as the IBM PC joined the Apple II and Commodore 64. Soon we will all have one at home. I run a lot of my 3D prints in the early morning before my day job or in the evening after my day job. And there is always a back-up for time on the printer. Between family and friends asking for prints, I found I was really running short of 3D printer capacity. So I decided it was time to look at purchasing a second printer so I can print in stereo. It helped that my son has been doing more printing for projects at his business so we came to an agreement to share the costs. At the $499 price it makes it so much easier to get two and still be less than the cost of a Makerbot or Ultimaker and since we have been having great success with the Davinci, we decided to get another one of the same model. We briefly considered the new DUO 2.0 with dual print heads but we couldn't justify the need for two colors for the extra $250 it would cost. It arrived late last Friday and then I spent all day Saturday unboxing it and setting up and then running a bunch of prints for him. I created a brief video of the unboxing and setup process for my YouTube Channel shown in fast motion. I'm still amazed at how much I'm using this printer (or now printers). I checked the new one for any cracked bearings and I don't see any so this looks good. Based on the serial number the new one is an earlier serial number than my original. I'm wondering if that means the newer one is actually older than my original? I can't find a date code. Anyway, I feel really spoiled now with two printers to print from. Have you ever wanted to just draw something and then print it out in 3D? Well that's what I show you in my latest YouTube video for my 3D print series. I used this method before to reproduce a Valence Clip by scanning the object in, but I decided to just try a simple phrase (in this case my name) written on white paper with a black marker. The YouTube video below and also at my Channel, takes you step by step through the process which is quite easy. I use some software tools on my Mac for editing but if you are good with photoshop or some other image editing tool, those may work even easier. The whole point is the simplicity of Tinkercad and the Davinci 3D printer make this something anybody could do quickly. In my opinion, that is the secret sauce to a breakout of 3D printing into everyones home; we need to make it simpler. When software for the 3D printers get so easy I can just draw and send to my 3D printer then things will start to take off. Or when I can scan at one 3D printer and it sends the file through the internet to another 3D printer 1000's of miles away to print automatically, then we'll have the 3D fax machine. How interesting will that be? I think we are getting closer everyday. I finally replaced the broken bearing mount on my Davinci 3D printer. I tried to print a large plastic bolt and nut but the results were not good. The shape of both were oval rather than round. This indicated the broken bearing mount was affecting the operation. XYZprinting had sent me a replacement bearing mount a few blog posts ago but I held off replacing it until necessary and this was it. I couldn't find any instructions or videos explaining how to do it so I made a video myself for anybody that may have to do the same. I posted it on my YouTube Channel so anybody can follow along. There may be a better way to do it but what I did worked pretty well. There is a replacement bearing mount that thinigverse user bret4 designed and posted on Thingiverse here. I can now print a few of these so I have backups for the future. I'm sure I'll break another at some point in the future. My printer doesn't spend much time idle. I'm always finding something to print. For my latest YouTube Channel Video / 3D Printed Project, I created a replacement flag for my Rubbermaid mailbox. This mailbox is super strong and has lasted a long time but the flag design is the weak point. It can break-off easily especially when snow gets deep on top and someone tries to clear it off, often breaking the flag. So I put TinkerCad to work and designed a replacement. I got the dimensions from the shaded outline left from the sunlight on the box. I designed it to snap in place but be tight enough to hold any position. Check out the details in the video below. Overall the design worked great. I actually made three prototypes. Each worked fine but I made minor improvements to end up with the one in the video. These things are hard to find so I may make them available for purchase somewhere for those that don't have a 3D printer. The .stl file is available at my Thingiverse page. My Canon MG3520 printer is a great paper printer but the tray to catch completed prints is way to short. It only measures 5 1/4" fully extended. This leaves all my prints on the floor and if there are no page numbers, I'm left with a puzzle to figure out how to put them back together in proper order. So I decided to improve the design and make a new paper tray to collect the prints. I removed the original tray and measure the width and the thickness of the rails. Then I used TinkerCad to create a much bigger tray. I extended it to about 7" which was just slightly smaller than the max size my Davinci 1.0 printer could handle. I slid the new tray in place and problem solved. Check out the video below from my YouTube Channel for the step by step instructions. I continue to find uses for my 3D printer. It's so handy to have in the shop. I can work on my books or electronics projects while it prints my latest design. Bigger jobs that take time, I can run at night and in the morning they are ready to use. I'm seriously thinking about getting a second one because I have more print ideas than I have time to print. The file for this print is on my Thingiverse page: http://www.thingiverse.com/thing:455476 When I first bought my Davinci 1.0 3D printer, I actually wondered if I would find enough stuff to print to justify the purchase. I've owned it for about 4 months and the thing has been running non-stop and I have a backlog of projects to print. I have some designs that I print for resale and it's helping to fund a potential 2nd 3D printer. I need the extra capacity so I can print my own designs while I print designs for other people. One of the latest prints for hire was a Solder Roll Bracket that mounted to a pegboard wall. One of our sponsors, gamersoption.com, needed 8 of these built-up for their ever expanding production line of XBOX and PlayStation Custom Modded Controllers. They sent me a starting design, which was created in TinkerCad, which was a simple L Bracket with a post sticking out to hold the solder roll. From there I went to work modifying it to fit the pegboard wall that was at the back of their assembly work benches. I added a triangular strengthening support and also posts to line up with the holes in the pegboard. A hole was added to the original L bracket so they could install a screw and nut. One prototype run and the design was proven to work great. I then when to work printing a batch of them, eight to be exact. The design was agreed to be open sourced so you can get it at Thingiverse. I produced a YouTube video showing how the design was done so if you get a chance, check it out above or at this YouTube link. |
Categories
All
Visit previous blog posts in the archives below.
Archives
February 2018
About ChuckChuck has been programming with PIC Microcontrollers since there were only five devices. Now there are over 700 and growing. He also has a lot of fun 3D printing designs using his Davinci 3D printer and TinkerCad software. In this series of blog posts and occasional videos on his YouTube Channel he tries to help you get started with electronics and 3D printing. Disclaimer |
- Books
- Chuck's Blog
- YouTube Channel
- About Chuck
- 3D Printing
- Getting Started with PICs
- Build Your Own PICKit 2
- CHIPINO
- CHIPAXE Breadboard Modules
- Understanding Hex Files
- chipKIT
- Newsletter Archive
- Contact
- Retired Designs
- Downloads
- Kickstarter Projects
- Great Cow Basic Site
- Buy Hardware
- Links I Recommend